Showing posts with label home efficiency. Show all posts

Wednesday, August 13, 2014

Canning is NOT hard

Let me start out by sharing a concern of mine.  I have mentioned to some of my mom friends that I worry Jonathan is going to come home one day and find me like this-

Sitting in the kitchen with a bonnet on churning butter so something.

The joke here is I am spending most of my time doing lots of domestic stuff.  Not necessarily a bad thing, it messes with my mind at times though.
---------------------------------------------------------------------------------------------------------
Back to canning-
Tomato plants are pumping out some major fruit these days.  It's a bitter sweet thing....
Sweet because, YAY!, we have lots of 'free' and tasty produce.  Bitter because, yay, now I have to find something to do with it before it goes bad.

This lovely basket was hand made by Dad Trexler

Thankfully, canning and preserving fresh tomatoes IS NOT THAT HARD.

On a side note, raw whole tomatoes freeze great for later use in soups, stews and sauce.  You don't even have to peel them.  Once they thaw the skin slips right off.

Back to canning-

If you are canning fresh tomatoes alone, you DO NOT need a pressure canner.  Only a pot big enough to hold enough water to cover your jars.  Last year I used a lobster pot (it was one of my New England welcome presents when I moved here).  This year I actually have a pressure canner thanks to a birthday present.  I recommend looking at the below websites for expert tips.  This post is just to show you how easy it is if you are thinking about trying it.
Also those that already can, feel free to share your tips!

USDA tomato canning guidelines - http://nchfp.uga.edu/publications/publications_usda.html
Pick Your Own website - http://pickyourown.org/canning_tomatoes.htm

First set up your 'processing line', which should include:

  • A boiling pot of water to blanche the tomatoes (big is good)
  • A bowl of ice water to quickly cool the tomatoes
  • A large pot for heating and crushing the tomatoes (if crushing)
  • A large boiling pot for the water bath with enough water to cover the tops of your jars by an inch
  • Cutting board
  • Hot jar handling tools (I got a simple canning kit that included jar tongs and a hot lid picker upper, that has to be its name) but maybe you could improvise here if you don't have the tools.
  • Ladle, strainer spoon, jar funnel and potato masher
  • Lemon juice

Also get your jars HOT and clean.  I do this just by putting them in the dishwasher through a washing cycle.  They come out, like I said, hot and clean.


You will also need new canning lids for the jars.  They are easy to find at the grocery stores or Walmart.  I re-use my rings and jars each year but they recommend you use new lids for sealing reasons.

1.  Blanche your tomatoes just until the skin cracks.

2.  Cool the tomatoes, slide the skins off and cut out the hard tops.


See so far not so bad-

The next steps are for canning crushed tomatoes.  See the previously listed websites if wanting to can whole or cut up tomatoes.

3.  Put some of the peeled whole tomatoes in an empty pot.  Heat pot quickly and crush when hot.  You want to crush when hot because the tomatoes (the pectin) start breaking down once they are cut or crushed.  Heat deters the breaking down process.  This breaking down causes separation (solids from the liquids) once in the jars.  This doesn't affect anything, just give them a shake before use.
4.  Cook crushed tomatoes for about 5 minutes.
5.  Add proper amount of lemon juice into hot jars (see websites for amounts and reason why).  I add 2 Tbsp for my quart jars.
6.  Ladle into hot jars.  Make a strange face (optional).

7.  Place a warm lid (I warm them in hot, but not boiling, water) and tighten the ring onto the jar.  Make sure lid seal and jar lip are CLEAN so to get a good seal.
8.  Place in the boiling water bath.

9.  Process/boil per recommended time.  For quart jars its 45 minutes.

DONE!

See I had quite a bit of separation (for a known reason but not interesting enough to share).  Like I said though, this doesn't affect taste or anything when using for cooking.  It all gets remixed back together.

I used about 45 Amish Paste tomatoes (similar to Romas or Plums) and 5 large Brandywine tomatoes to  get these 4 quarts.

I use our canned tomatoes for making sauce, soups and stews.  Last year we discovered how amazing (and ridiculously quick and easy) making homemade tomato soup is.  My favorite recipe here- http://www.marthastewart.com/343299/creamy-tomato-soup
Just a note, Campbell's tomato soup second ingredient is High Fructose Corn Syrup.  Not that I am against eating HFCS but prefer to limit it as much as I can.

OK, hope this was helpful.


Wednesday, February 12, 2014

Curing Hams

We are attempting to cure our own hams this winter.
Mainly for two reasons:

  1. The place we send our pigs to de-bones the hams and smokes them, the hams are usually small and somewhat dry (granted they are not injected with solution like the store hams).
  2. After Jonathan ate my parent's home cured country hams he fell in love.  You can't get anything like that around here that I know of.  Maybe something similar at a specialty store possibly but would be expensive.
So with my parent's counsel we are trying to cure our own.  I hope I wrote down the correct notes over the phone from my Dad.  At the time I was over due pregnant and more brain challenged than usual.

Here is what we did-
We started with one of our FRESH hams.  Not one that talks back, but one that has not been smoked or cured.  The ones at the store are usually smoked or cured to cut down on cooking time.  Our meat processing house gave us one full fresh ham back cut into the two standard pieces: the shank and the butt-

The Butt End is what it implies, the butt or buttocks of the pig.  The Shank is the part below the butt, so more like the pigs back thigh area.
Here is our Butt and Shank (the shank ham already has the rub on it).  They are about 8-10 lbs each.


Here is the recipe my Dad gave me.  I had to search around for Salt Petre (potassium nitrate) but was finally able to get it through the CVS pharmacy for around $5.  Its available online also.

2 cups brown sugar, 1 cup table salt, 3 teaspoon black pepper, 1 teaspoon salt petre-

Rub it on to about 1/8" thickness.  It also exfoliates your hands.

Then we wrapped them in butchers paper.  I was told not to use any waxy type paper so the meat can breath and drip out juices.  Now they just need to cure for around 30-40 days in temperatures between 32-40 degrees Fahrenheit.  The old timers would hang the hams in their smoke house.  We plan to do the same in our shed but temperatures have been really cold here this month.  Right now the hams are curing in our frig.  
If the temperature is below freezing then its not a big deal, the hams just won't cure due to being too cold.  Therefore you would have to allow for more curing days.  If temperature gets above 40 degrees though then the meat could spoil.

Crossing my salty fingers it works!  We will let you know.


Wednesday, November 6, 2013

Growing A Garden, How Much Money Is Saved???

I set myself to keeping records of garden harvest this year.  I mainly wanted to get an idea of possible cost savings, what plants give us the highest 'payback' and what we should focus on or not so much focus on in the future.
Fellow gardening friends should be encouraged too.  There are more benefits than just tastier food (as I am sure you know this).

So how much money did this rectangle of dirt grow?


Here is the breakdown, prices are from my local Stop & Shop grocery store (which I consider to be the local average price range).  Note that we grew everything organically which in the store is an even more expensive product than I have listed below, I used the regular produce price-

Red and Blue Potatoes:
Total weight grew- 23.5 lbs
Total savings @ $4.99/ 5lb bag = $23.45

Chips made from blue potatoes-


Garlic:
Total weight grew- 1lb 7oz (about 19 bulbs)
Total savings @ $6.34/lb = $9.51

Green Beans
Total weight grew- 9.6 lbs
Total savings @ $2.49/lb = $23.95

Soybeans (Edamame)
Total weight grew- 1.5lbs
Total savings @ $5.99/ 10 oz bag = $11.98


Sweet Corn
 Total weight grew- 30.6lbs (or 73 ears)
Total savings @ $2/dozen = $12.17

Corn beard-

Leaf lettuce
Total grew - roughly equivalent to 3 bunches (its still growing alittle)
Total savings @ $1.99/bunch = $5.97

Eggplant (Ugh, I'm still having nightmares about all the eggplants, a blog post about using it here)
Total weight grew - 32 lbs (or 82 fruits, but I threw and gave a bunch away)
Total savings @ $1.99/lb = $63.68
Note to self, grow less of these next year.

But the ratatouille was amazing.... and freezes well to make great soup fillers for the winter.

Beets
Total grew- 3 lbs (still some growing in the garden)
Total savings @ $3.49/1.5 bunch = $10.47

Heirloom Tomatoes
Total weight grew- 30 lbs (or 35ish tomatoes)
Total savings @ $2.99/lb = $90.76
~Note, this is an unfair price.  I used regular tomatoes price here instead of an heirloom tomato price.  There were no heirloom tomatoes for sell in the store at the time of my price gathering but I know the price for heirlooms would be more.  Pretty much I am saying, the total saving should be more.

Amish Paste Tomatoes (similar to Roma or Plum)
Total weight grew- 27 lbs
Total savings @ $1.99/lb = $54.31

Pickling Cucumbers
Total weight grew- 15.25lbs
Total savings = ?? store cucs were priced per fruit not pound, I did not keep count of the fruit but there were alot.  I canned 8 quarts worth of pickles and we ate fresh cucs almost regularly for lunch.


TOTAL savings all together = $305.26

To be fair I will factor in the seed and seedling expenses,  which comes to $43.13
So that would bring it down to $262.13.  I don't preserve alot of my seeds from previous plants nor do I hassle with growing some things from seeds for transplanting (like tomatoes).  I buy seedlings instead from a local nursery.  Those that do this will see even more savings than us.
I would like to add that I did not count some things (such as blueberries and sugar snap peas, that just provided maybe one meal or snack), nor did I include our cherry tomatoes, there were too many to count (and I am not growing them at all next year).  I also want to note that I messed up our highly anticipated heirloom sweet potato crop.  We were expecting a HUGE harvest, but I made a growing mistake for our region... it will be corrected next year.
For those overly analytical people, I did not log hours spent working in the garden (to know what our time is worth).  The reasons for gardening goes well beyond cost savings for us.


I thought the above information would be nice to share for encouragement to other people trying to grow their own food... whether large, medium or small operation.

For now though, all garden thoughts can rest.... then we will hit it up again next-


Thursday, August 8, 2013

Basement Drains Complete

Our basement job was completed within one day.  This was nice since most businesses we have contracted for jobs have been late to start and late to finish.  We are extremely pleased with the company and their workmanship so let me know if you would like their name.  So far only two businesses/contractors that have worked on our home have really pleased us: this basement company and the guys who installed our carpet.  Working with good people makes a BIG difference.
If you don't remember, we needed work done due to our basement flooding.  Post about the work is here- There's a Jackhammer in My Basement

Here was the old sump pump area (and lowest point in our basement) during the work-


Here is the completed job-


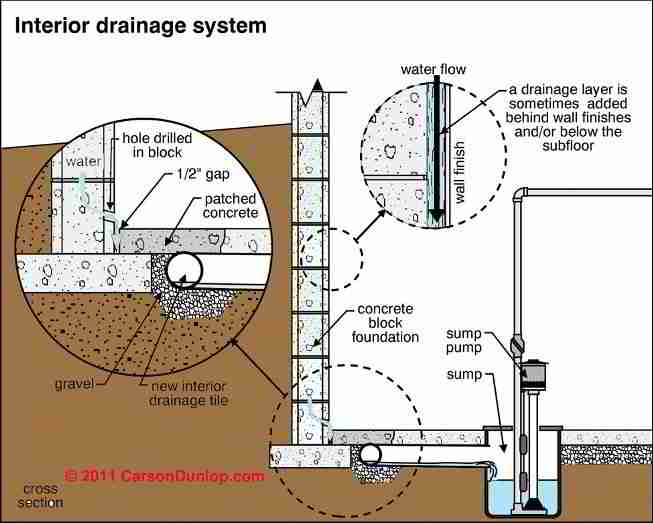
So the basic technology of the Grate Drain is the below rectangle chambers act as a submerged gutter.  These gutters or chambers are submerged around the entire perimeter of the basement, surrounded by gravel and covered by concrete.  The outside water flows down the exterior basement wall and through holes made in the wall parallel to these chambers.  The ground water flows into these chambers and is then pumped out instead of seeping through the floor and the wall/floor joint.


There are access ports all around the perimeter in case the system ever needs to be flushed.  We can also connect a hose from our dehumidifier to a port, so we don't have to continually dump the bucket (we were having to dump it every few days through out the summer).

Others pictures of the finished product.  Jonathan's 'shop' area-


Drain added at base of bulk head stairs.  Water sometimes gets through the bulk head and runs under the door into the basement.


We have heat and a separate thermostat in our basement which is nice.


This area we are considering to finish as a playroom.  This is very exciting and makes this expensive project even more worth it (since before it was NOT a possibility with all the flooding we kept having).

It also makes storing things down in the basement easier.  Before, items stored in the basement smelled musty and always had to be off the ground.

Like I said, it was expensive work but we do not have to worry with flooding anymore.  And since we have a generator even power outages are not too much of a threat.  Good peace of mind especially since it's hurricane season. :)

Wednesday, January 9, 2013

Window Again Delayed, Two Small Updates

Its still there, hanging out on the side of our house.... the old sagging window, along with his vinyl-ey curtain friends-


Our contractor said it was not assembled when he went to pick it up (it unexpectedly ended up being a custom built job by Andersen Windows, and they did raise the price on us some but not too much since we had already agreed on the quote).  He said the plan is now Friday but rain is in the forecast so we will see.  The kids have been upset about the matter-

Or its possible it was about another matter.... its hard to tell.
In the meantime, Jonathan recently made progress on some 'small' jobs.  The first is not small to me, since I now have a rod and shelf in a closet of my own.  For awhile we were sharing one closet-

Now there are two!

He also insulated under the kitchen floor, keeping the floor a bit warmer... so I can cook barefoot all year round (isn't that why Barefoot Contessa's cooking is so good?)-

He choose to put the paper side up because we have a moisture problem in our basement.  If the fiber glass fill was instead against the wood and the paper was on the bottom moisture could get trapped between the fiber glass and the paper.  Which would be trapping moisture up against the base floor/hardwoods just above, and could result in mold also.  The paper being against the wood should 'help' in keeping the direct moisture away.  It has made a difference in warming up the floor... along with him filling all the little holes and openings around where the pipes and such exit the basement wall into the cold outside.  Knocking another item off the list suggested to us by a home efficiency specialist.
Maybe the cold floor is why the kids were upset?  I wish it were that easy....