Friday, June 26, 2015

New Coop, First Summer Report

This spring a friend generously gave us his shed he had transformed into a coop.  We were wanting a shed style coop after we had another, we think, weasel attack on our laying pullets which killed one.  Weasels are very hard to keep out since they can squeeze through very small spaces.  The pre-fab sheds are nice because they are solid and easy to secure for the night.


Jonathan made a few alterations such as adding egg doors so the kids could collect the eggs, and a ramp for access to the chicken yard.  Locks and latches we choose were important because some predators can work and open simple devices.


The kids enjoyed the temporary play house.


New pullets seem happy, and it has kept out a lingering raccoon.


We are very thankful Andy's kindness for even transporting the shed to our house. (This is also the friend that drove his tractor across town to turn over our yard for starting our garden 4 years back.)  Thank you Andy!

That garden has been doing ok considering the super dry spring we had. (Planted: tomatoes, white and sweet potatoes, snap peas, beans, leeks, garlic, collards, carrots, beets, lettuce, dill, cucs, radishes, sunflowers, melons and second annual returning pumpkin (came back from last year's pumpkins left)

White and red potatoes are THRIVING this year.  Beets and collards doing pretty good too.  Snap peas as always are doing just so so (New England springs are not the best for snap peas).   Our peas usually don't make it back to the house since the kids eat them first.  I think they like snap peas so much just because they have permission to pick them their self.  Little lady is eating a strawberry.

See what I mean, only one pea made it safely back to the house.  Oh and I forgot about our rhubarb, conveniently ready during strawberry season (rhubarb, strawberry cobbler is one of Jonathan's favorite).

Pigs are growing nicely.  They have nice length in the loins showing the Landrace breed influence (these are Landrace/Hampshire cross breed).  Hams and shoulders are not as rounded as our last Hampshire/Yorkshire crosses but still plenty meat there.


I am continually pleased by the quality stock we get from our piglet farmer (he grows pigs, cows and chickens for meat also and sells to local restaurants, all free range for those curious).

Thats it for now.  As always, construction is in progress on the house.  Dad and Mom T. were here last weekend and helped with some projects.  I hope to share some completed updates with you soon.


Wednesday, June 10, 2015

WHY You Should Grow Your OWN Asparagus!!

I initially named this post Asparagus For The Best Of Us (yes Festivus/Seinfold wannabe knockoff, though not as witty, I know), but thought people wouldn't catch what I wanted to say:

Which is-  Plant asparagus once, eat it for life.
Note: I was an ok asparagus fan until I ate fresh asparagus, its so tender and way more tasty.  Our kids even eat it.

Asparagus is a perennial which means it keeps coming back, ON ITS OWN!  That's right, you plant the roots once/do the work once/sweat a little bit once/schedule a little time out of your day once/dig a hole once/did I mention you do it only once and you get fresh asparagus to eat every year after*.   Thats it!  From what I have read, plants can produce for up to 25-30 years!
*depending on the maturity of the plants you might have to wait a year or two before you can harvest.

Lets start at the planting part, that you only HAVE TO DO ONCE.  And note I am not the local asparagus expert, Jonathan and his Dad are and Jonathan actually planted it.

Step 1.  First you order some asparagus crowns/roots.  I believe it is recommended to get 2-3 year old crowns which will allow you to start picking them sooner.

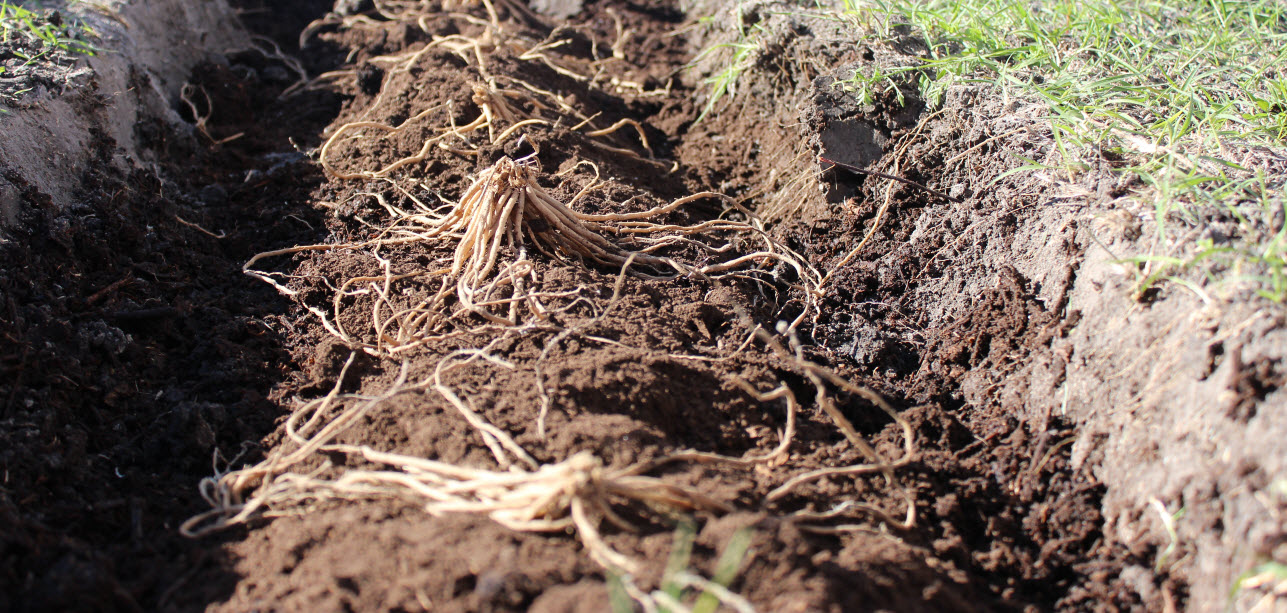
Step 2.  Dig your trenches per your crown's growing instructions (different varieties are different) and follow soil prep instructions.  Doing it right the first time will give you healthy plants for YEARS to come.  We added compost and some phosphate (easy to find at garden stores) to the bottom of the trench to encourage root growth, that's all.  The below photo is of a different variety than ours that did not need as deep of a trench.

http://masterofhort.com/tag/planting-asparagus/

Step 3.  Cover the roots, wait and keep weed free.  We mulch on top of the row with chopped up leaves from the fall, straw would work too.

Step 4.  In early spring watch for the light purplish noses to pop up.  It's an exciting moment.  Here in New England they pop up around mid April.  Not sure about my parent's asparagus in Tennessee, I assume earlier.


Step 5.  Cut the asparagus spears when they are about 5" to 7" tall and over a half an inch in diameter (is the rule of thumb I have heard).  First year and second year, if you planted mature crowns, go very easy on the picking.  We picked just a few bunches worth the past few years.  The third year I hear you can harvest for up to three weeks.  Read up on it yourself though because, as I said, I don't count myself as an expert.

Step 6.  Let it go.  That's right (and not talking about a solo on a North Mountain), let the plants go and grow.  They will get around 4'-6' tall but are absolutely beautiful.

Our asparagus bed in the morning-


Step 7.  Enjoy the seasonal foliage, keep bed weed free and wait till next spring for more free food.
Red 'berries' late in the season

I don't know much about growing it in restricted garden space (such as containers) but I have seen pictures of it.... so it's maybe worth a looking into if that might be your only option.

Hope you jump on the asparagus train.  Woowooo!